CTR2-Mini (herein referred to as ‘the Mini’) is a smaller, less complicated, less expensive alternative to the CTR2 radio controller featured in the Sept/Oct 2021 and Jan/Feb 2022 issues of QEX magazine. The Mini uses a Seeed Studios Wio Terminal for its processor. Unlike CTR2 with a separate display and controller, the Wio Terminal is the display and the controller! An article on the Mini was published in the September 2022 edition of QST magazine.
Almost as soon as the QST article was published I set out to redesign the Mini to include additional features not available, or available as an external option. The new Mini is named Mini+. It is even easier to build and has an integrated 12 VDC power supply, center mounted encoder, an improved sidetone amplifier, and a built-in Radio I/O circuit so you don’t need an external Radio I/O if you only have one radio to control. It runs the same firmware as the Mini so all of the features in this blog are also available on the Mini+.
The Mini puts the basic controls of all your radios right were you need them, next to your key or keyboard. Enhanced functions for specific radios gives you even more control. Functions you use the most can be assigned to the 5-way switch or to function buttons.
So what does it do? Well, for starters, the Mini provides an extremely small user interface that includes radio control and CW keyer features. It is entirely self-contained, no PC is required, but it can integrate into a PC environment when needed. Because of its small form factor it can easily sit anywhere on your desk. Your radios can be placed more than an arm’s reach away as most of the repetitive tasks such as tuning and mode changes can be handled on the Mini. It manages frequency lists, CW transmit buffers, and band stacking registers for each radio port and it has a shared radio database available to every radio. It can control RIT if your radio’s CAT protocol supports it. The unit supports multiple radio CAT protocols and the Mini+ has a built-in radio I/O circuit so it can control one radio without the external Radio I/O module. It also has a CW keyer that supports contest operations (sequential serial numbers and exchanges) and has a practice mode to help increase your code speed.
If you’re a FlexRadio Series 6000 owner you’ll be happy to know that multiple Mini’s can connect to your radio at the same time, with each Mini controlling one of the slices. You can even run real CW over the network so you can connect your paddles to your Mini upstairs and run CW on your Flex downstairs (or across the state). A new ‘mini’ panadapter is also available on the Mini when you connect to your Flex in GUI client mode.
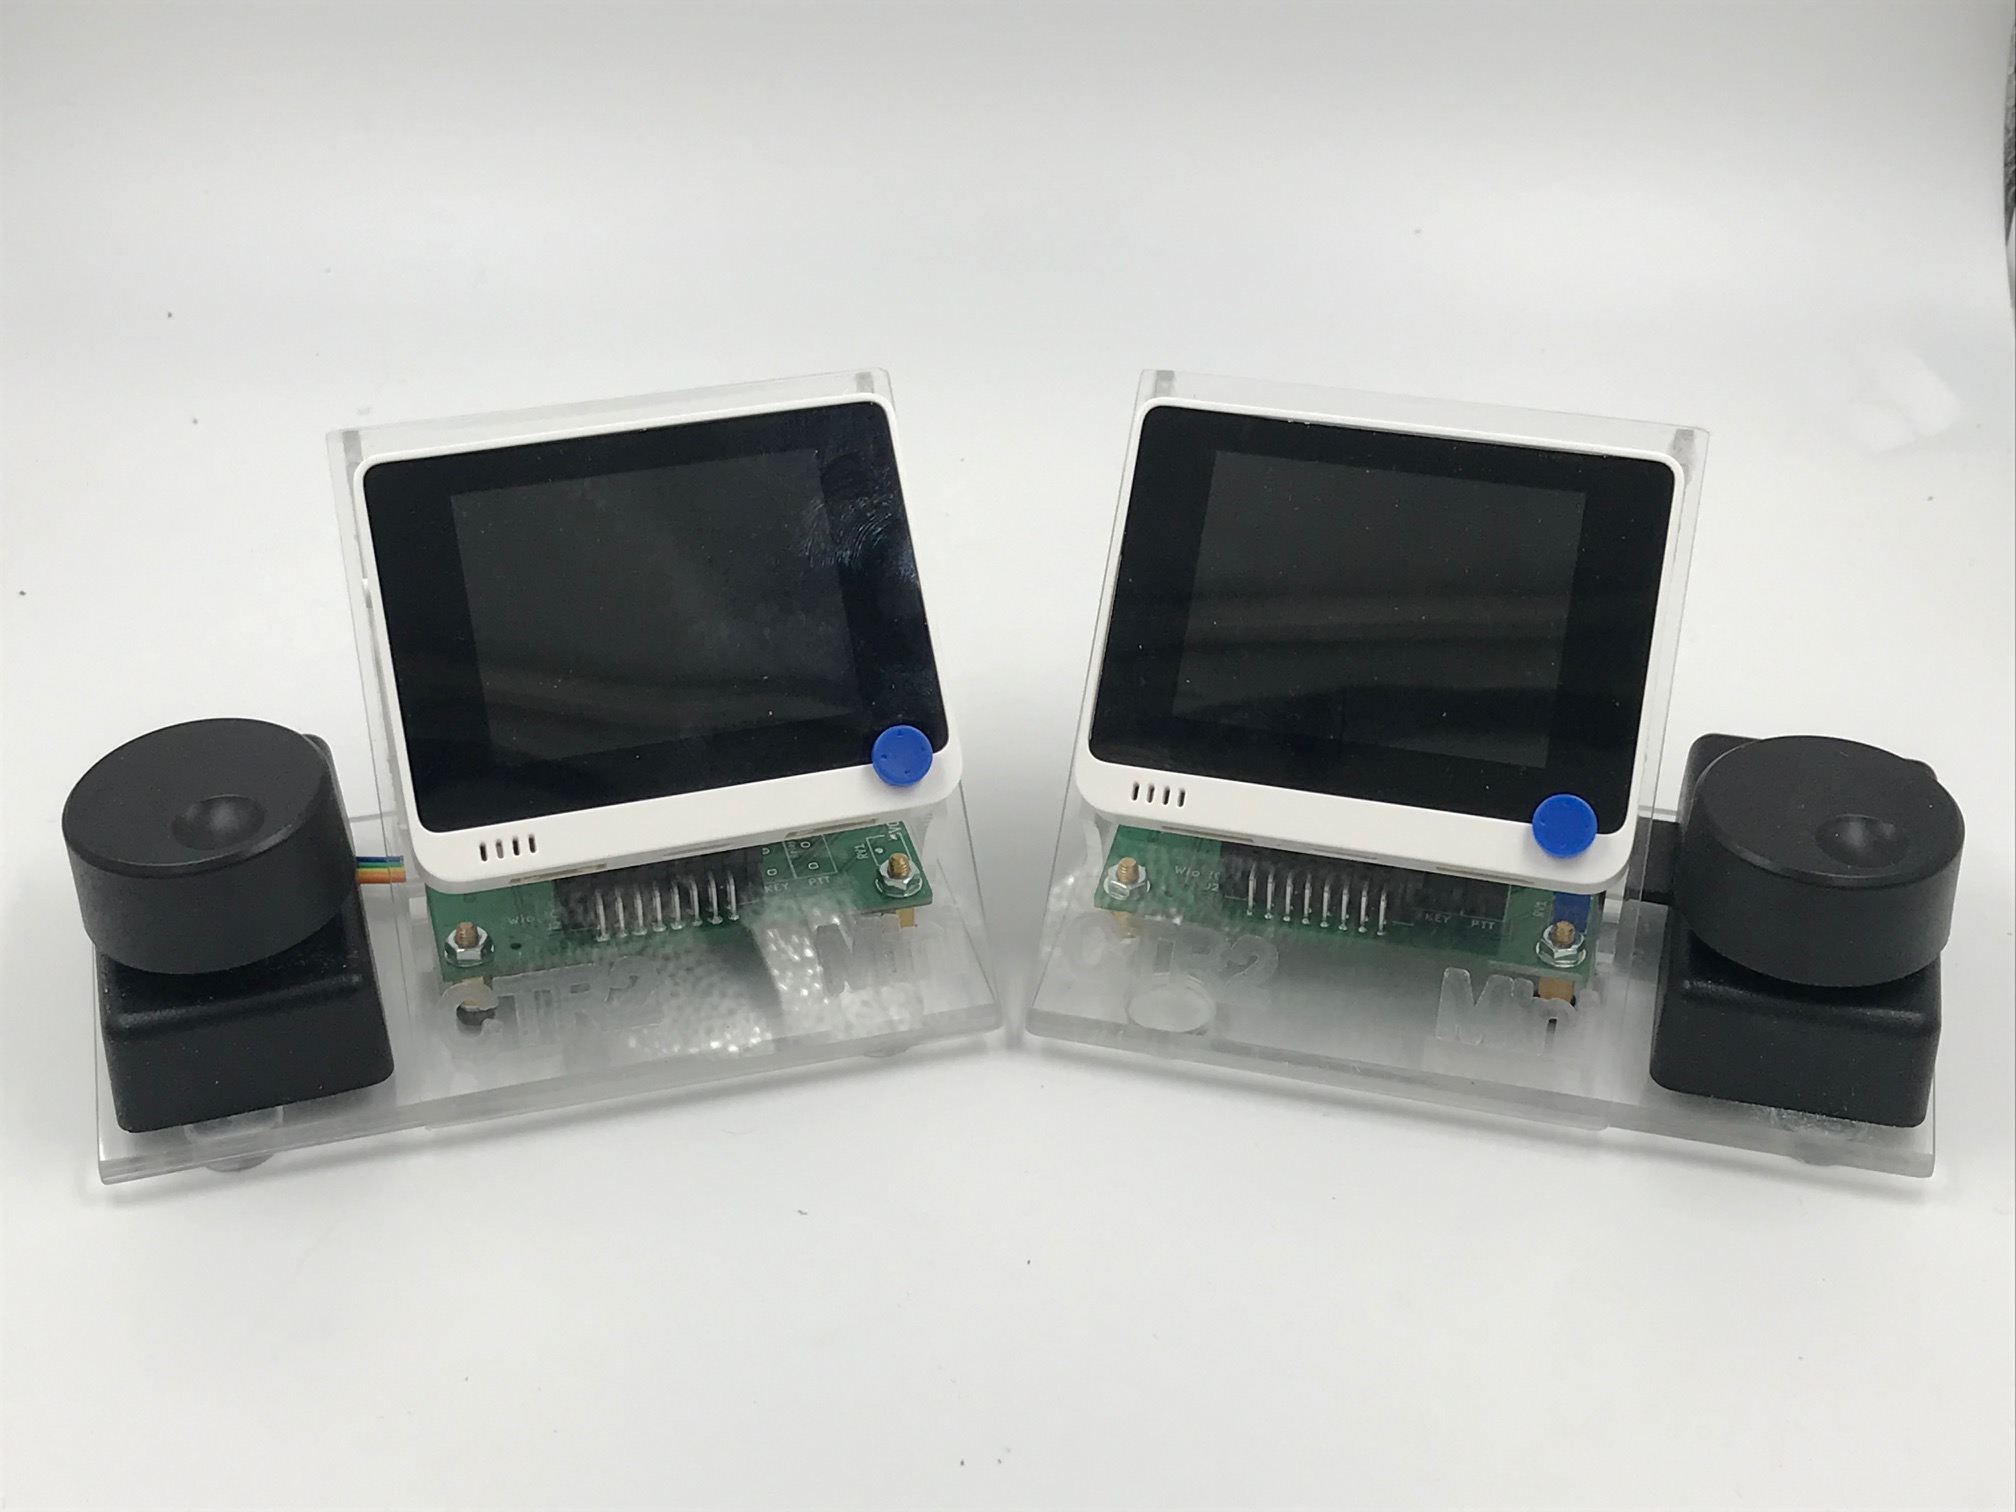
If you don’t own a dual-receiver radio you can get similar functionality by deploying two Mini’s and controlling two radios (on separate antennas of course) at the same time. The Minis can be linked together using WiFi or Bluetooth LE giving you some exciting operating options that you can’t get any other way.
Linking two Mini’s and their radios together gives you the following options:
- Tune each Mini/Radio separately but synchronize the keyer settings. You can push or pull frequency and modes settings from one Mini/Radio to the other. This allows you to use one radio as a ‘spotter’ radio and then move it’s frequency and mode to the active radio to make the contact.
- Tune both radios to the same frequency with either Mini or either radio. In this mode, since both radios are on separated antennas, you can pick the radio/antenna combination that has the best signal and you can use either Mini or either radio to tune.
- Tune both radios on different frequencies with either Mini or either radio. For instance, when searching in a contest you can tune two bands simultaneously with one dial and pounce on a station calling CQ on either radio.
- In the remote control configuration the “B” Mini is located at your station and is connected to your radio. The “A” Mini is remote and controls the “B” Mini and your radio over the Internet. Simply add an audio server such as Sonobus or Mumble and you can remote control your radio from anywhere.
I have several YouTube videos introducing CTR2-Mini. The early ones are based on the original Mini but all the features demonstrated are supported on the Mini+. You can view them on my channel.
Here are some links to a few of the videos…
It will give you good idea of what CTR2-Mini is all about, and what it can do for you. I am adding new features the Mini almost daily so some of these videos will be out of date. I’ll keep the feature list at the end of this page current.
I’ve also posted a construction video showing you how the original Mini goes together. The Mini+ construction is covered in its assembly manual.
For those that have Flex radios, I’ve posted a video that goes over the special FlexRadio features included in the Mini. Multiple Mini’s can be connected to your Flex radio with each controlling their own slice as demonstrated in the video below. New features have been added to the Flex radio control that aren’t covered in this video. The operations manual has the latest information on all of the Mini’s features.
I also have a video that goes over the Mini’s User Interface in detail. It’s a pretty long video (25 minutes) so I’ve included a timeline in the video description so you can skip through it to find things you’re interested in. Again, this is an older video. Checkout the operations manual the the latest information.
I’ll be posting additional videos on the near future that go over other aspects of CTR2-Mini so if you want to be notified when these videos come out subscribe to my channel and click the Bell button.
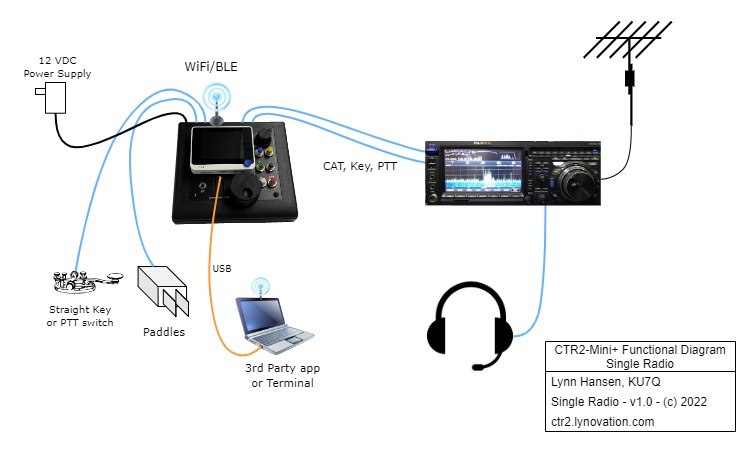
Here’s a few configurations to help you visualize how the Mini can be configured.
The basic system to control one radio…
A basic system to control multiple radios…

Hold the phone!
The new CTR2-Mini I/O Multiplexer is available now. The multiplexer replaces the manual RJ45 switch shown in the drawing above. It automatically routes the desired radio’s I/O when you select a Radio Port in the Mini. It features a remote antenna switch output that you can use to control an external antenna switch to route the antenna to the selected radio too.
Here’s a diagram of the new multiplexer configuration with radio antenna switch control…

CTR2-MINI FEATURES
The following features are supported by CTR2-Mini:
- Up to 16 radio profiles can be created and controlled by the Mini
- Each radio port has its own settings, radio CAT protocol, favorite frequency list, band stacking registers, and 14 CW message buffers
- A common database of settings can be shared between all radio ports
- Any radio profile can be copied to another profile. Just change the radio CAT setting (if needed) and have all the same settings for different radios.
- A manual RJ45 switch or the CTR2-Mini I/O Multiplexer can be used to select from multiple radios as shown in the drawing above, or you can just control one radio.
- Function button assignments are saved to each radio profile. This allows you to configure your function button functions differently for each radio.
- You can share up to two mics and your headphones will all of your radios by deploying the CTR2-Audio Controller.
- The user interface for the Mini uses a small color display and a rotary encoder. It does not have a touchscreen but menu navigation is quick and easy. Text can be entered using the encoder (scroll for a character at each position), using the paddles to key in the text, or with your PC’s keyboard when you connect to Mini with any terminal program. You can also edit files on the micro SD card on your PC. This really helps if you want to import Internet frequency lists.
- All radios are controlled using the same user interface (i.e. all radios look the same to the user). Most radios have an expanded Radio menu that gives you control over many of the features in the radio.
- The value editor window is “sticky”, meaning it doesn’t automatically close once it’s opened. This allows you to open a parameter like RIT or Keyer Speed and leave it open during operation so you can adjust that parameter ‘on the fly’. Many parameters like RIT and volume can be toggled On/Off without leaving the window. For instance, you can open RIT and adjust your Rx frequency offset, then long-click the encoder to temporarily turn off RIT for normal operation. Long-click the encoder again to return RIT back to where you were. Short-click the encoder to accept the new RIT setting and close the window.
- The Mini supports Icom, Kenwood, Elecraft, Xiegu, and several Yaesu CAT protocols. Other radios based on these protocols can also be controlled. Dedicated menus are included to provide additional control of the Flex 6000 radio series, Kenwood, Icom, Xiegu, Yaesu FTdx models, and the Icom PCR1000 wideband receiver. If your radio isn’t included in the current list let me know. I’d be happy to work with you add your radio to the list.
- Hamlib rigctld is supported. This allows you to control your radio over an IP connection if your radio includes rigctld support. I use this to control my Xiegu X6100 over WiFi.
- The multi-function rotary encoder natively changes frequency – click it to step through additional setting options using a menu driven user interface.
- 5-way switch on the Wio Terminal can be programmed to execute specific functions like changing modes, band, volume (on supported radios), etc.
- You can assign one function or menu to the [C] button so it can be executed without scrolling through layers of menus. For instance, RIT can be assigned to the [C] button so one button press gives you the RIT adjustment window. Other functions such as PTT and Keyer Speed can be assigned to this button along with various menu such as the Frequency, Mode, Band, VFO, Tx Memory, Edit Tx Memory, WiFi, Theme, or the Radio menu. When linking two Minis together this button can be used to push or pull frequency and mode data from the other Mini in Basic Link mode.
- The Mini and Mini+ can be completely controlled from your keyboard when it’s USB serial port is connected to a terminal program on your PC such as Putty or Tera Term. Menus are presented in the terminal window just as they appear on the Mini. Keyboard keying is also supported. Just enter your text and press [Enter] to send. Message buffers can also be sent from the function keys.
- Frequency control is accomplished using several different methods
- The rotary encoder changes the frequency by the selected frequency step (highlighted number in the frequency display). Press and turn the encoder to change the frequency step. Spinning the encoder fast changes the tuning rate by a factor of 10.
- Keyboard cursor control keys control the frequency and step when a terminal program is connected to the built-in terminal interface on the USB serial port.
- Two VFOs are included, A and B. These are specific to the Mini. Your radio always stays on VFO-A. Both VFOs and their modes are saved in one memory slot.
- Select a favorite frequency from a list of 200 frequencies (100 for VFO-A and 100 for VFO-B).
- Select from up to 10 of the last frequencies visited (including modes)
- Receiver Incremental Tuning (called RIT or Clarifier depending on the radio) is supported for many radios.
- CW operation mode has the following options
- The keyer supports straight key, pass-through, Iambic A and B, Ultimatic, and bug modes. Pass-through mode controls the Key and PTT outputs with the left and right paddles. This allows you to use an external keyer or your radio’s built-in keyer if you prefer.
- Keyer speed is adjustable from 5 to 50 wpm. Farnsworth spacing is also available for the CW message buffers.
- A sidetone interface means the keyer can be used for code practice when transmit is disabled. A 3.5mm jack is provided for private practice or for connecting to a larger speaker.
- When connected to a terminal program such as Putty or Tera Term, CTR2-Mini provides a keyboard keyer.
- Prosigns can be embedded in message buffers that automatically send your call (^), contest SN (#), or contest exchange (%)
- Auto-speed changes can be applied to repetitive exchanges such as contest ‘599’ RST reports. Simply bracket the text in the buffer with asterisks (*) to increase the sending speed 50% for that text.
- Message buffer #1 always holds the last buffer sent so it’s easy to repeat a contest exchange without incrementing the SN.
- The Remote PTT Input jack provides three options.
- Normal mode just passes the Remote PTT input signal on to the PTT Output of the radio I/O module. A ground on the Remote PTT Input grounds the PTT Output.
- Latch mode toggles the PTT Output on the radio I/O module each time the Remote PTT Input is grounded. Push once to key PTT then push again to unkey PTT.
- Key mode passes the Remote PTT Input on the the Key Output of the radio I/O module. This allows you to connect a straight key to the Remote PTT Input and use it along with the Mini’s keyer to key your radio.
- When the Remote PTT is configured for Normal or Latch mode six function buttons are connected to the Remote PTT input port on the Mini+. Function buttons use a resistive ladder to present different voltages to the Remote PTT Input ADC based on the button pressed. Two functions can be assigned to each button, a primary and secondary (Shift) function, so common functions or CW message buffers can be assigned to them. Radios with enhanced support include additional functions such as volume and Tx power control.
- The [C] button on the Wio Terminal can be used as a latching PTT button in-lieu of using a remote PTT button. Enable Tx first (press the [A] button, then press [C] once to enable PTT and push it again to disable PTT.
- The USB-C port supports a USB serial port. Use this port for:
- 3rd party applications to control the selected radio through CTR2-Mini
- The USB serial port emulates a Kenwood TS2000 transceiver – commands from your 3rd party application to control CTR2-Mini‘s TS2000 emulation are translated into the appropriate command to control the selected radio. Your 3rd party app can control PTT using Kenwood’s TX CAT command.
- You can connect to the USB serial port with a terminal program as described above. The terminal interface displays the menus just like your were controlling the Mini locally.
- 3rd party applications to control the selected radio through CTR2-Mini
- The Mini can connect to your local WiFi network. This is required for Flex Radio CAT control. Any radio protocol can be routed to WiFi instead of the serial CAT port. Use a hardware serial terminal server or terminal server software on you PC to convert the WiFi CAT data back to serial for your radio.
- The Mini’s Flex interface gives you the following features:
- Connect to any slice on your Flex radio. You can also create new slices and panadapters.
- Display a ‘mini’ panadapter on the Mini’s Home page when running in GUI client mode.
- Multiple Minis can connect to your Flex radio simultaneously. This gives you the ability to have a physical knob and favorite frequency list for each slice. Make a slice active by pressing the [A] button (Tx Enable) on the Mini controlling that slice. Any other connected Mini’s and their slices will revert to inactive mode. If SmartSDR is running it will automatically switch to the active Mini’s frequency on the panadapter.
- Control the DSP filters and volume on the slice you are controlling.
- You can change the default IP port from 4992 to any valid port #. This allows you to forward an IP port through your router to your Flex radio and connect the Mini to if from the public Internet. You will probably want to add additional layers of security for this option.
- You can select either hardware PTT (through the Mini or Radio I/O module) or control PTT input from the Flex network API using the ‘xmit’ command. Using the API allows your Mini to control your Flex remotely without the need for SmartLink.
- You can select either hardware KEY (from the Radio I/O module) or control the KEY input to your radio over the Flex network API. This allows you to connect to your Flex and have a real CW QSO with just a Mini in another room (or another state). Use SmartSDR on your iPad or iPhone or an audio server such as SonoBus or Mumble to pass audio between you and your radio.
- The Icom PCR-1000 is supported. If you have one of these receivers kicking around the Mini can bring it back to life at a very reasonable cost.
- Two to 16 radios can be controlled and automatically selected using the CTR2-Mini I/O Multiplexer configurations.
- You can link two Mini/Radio combinations together and operate them in several different modes as described at the top of this page.