
January 1, 2026 Update
In order to simplify the CTR2 product line and eliminate confusion, CTR2-Dial hardware is scheduled to be discontinued once the current inventory of parts runs out.
It is being replaced with the new CTR2-Uno, CTR2-Duo, and CTR2-Quad hardware. The new hardware provides enhanced operator controls, and supports CW paddles and Straight-key/PTT inputs on every model. The new hardware is available in the New Age or 3D printed enclosure. It runs the CTR2-Flex firmware which supports both the CTR2-Dial MIDI and CTR2-Flex WiFi control options.
I’ve posted a video introducing the Dial on YouTube. The new hardware is functionally equivalent to what is presented here.
CTR2-Dial firmware is based a MIDI controller on the M5Dial from M5Stack, a world-renowned provider of quality embedded control products. The code base from CTR2-MIDI has been extensively modified to support the Dial’s display and more controls have been added.
A Little History
CTR2-MIDI is a simple, compact, yet rugged MIDI controller designed with ham operators in mind. With a multi-function encoder and six dual-function pushbuttons it’s easy to remember what each control does. The physical knob and pushbuttons provide tactile feedback so you can “fly it blind”. Its small size and lack of a display means you don’t have to worry about throwing it into a day pack or your travel luggage. It supports an external paddle and brings true CW operation to remote operations. It’s also preconfigured and works with many radio control apps like Marcus’s (DL8MRE) excellent iOS/MacOS apps for Flex, Icom, Kenwood, and Yaesu radios. It’s also perfectly at home controlling Thetis for your ANAN and Hermes Lite rigs. It even works great with Remote Ham Radio.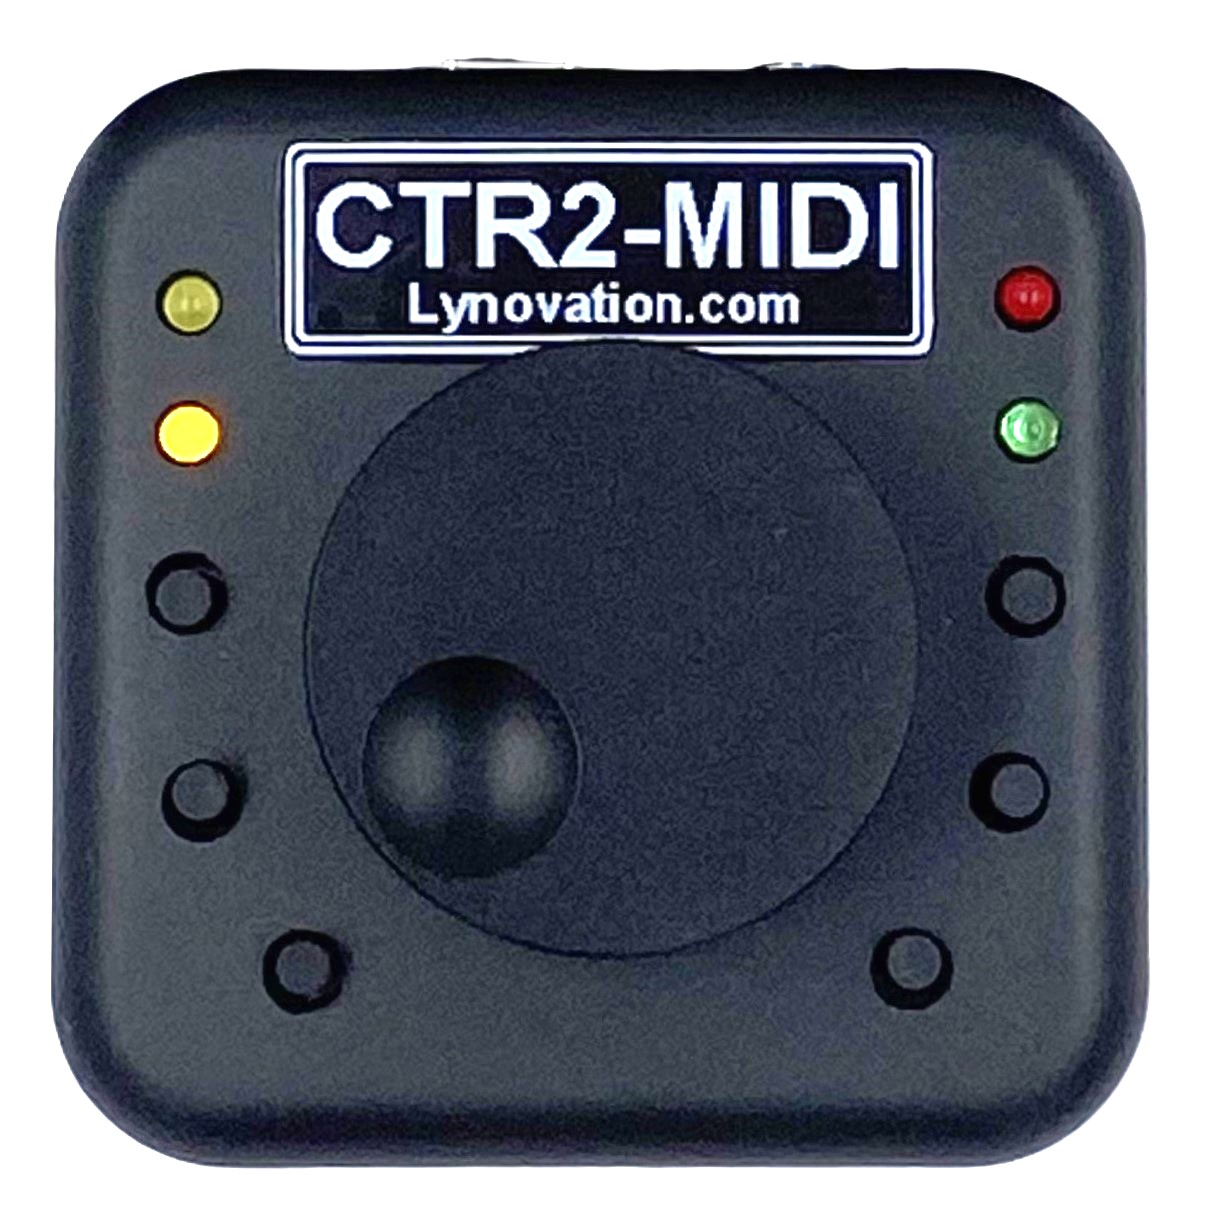
But with this simplicity comes some limitations. While it has 8 encoder functions, it’s up to you to remember which function is assigned to each encoder mode. Same with the six pushbuttons. Each button has a short and a long-press function and you need to remember which button does what. Due to the limited number of controls you may find yourself reaching for the touchscreen on you iPad of iPhone more often than you would like.
Touchscreen Display
First, the CTR2-Dial hardware has a color touchscreen and only one physical button. Buttons and encoder functions (called dials on the Dial) are virtual. This provides for more options than ever before. The Dial has 42 button functions (enough for dedicated band and mode buttons) and 18 dial functions.
When running on CTR2-Uno/Duo/Quad hardware, CTR2-Dial firmware supports up to four knobs. Each knob has an integrated pushbutton that allows each knob to be assigned to two dial functions using a turn and “push and turn” action. Each knob pushbutton can also be assigned to two button functions using a short and long-press actions.
Fortunately, every control function has a user defined label so there’s no guessing at what function a button or dial performs. The Dial’s small display (1.28″) becomes a control surface for your radio control app.


You can easily navigate between the dial, buttons, and knob menus with a finger swipe. Press the physical button on the orange ring to return to the Home page. Touching the label in the center of the Dial page opens the Dial menu. Turn one of the external encoders (called Knobs) to instantly change the parameter assigned to that control. Knob menu(s) on the Home pages allows you quickly choose which control(s) you want the knob(s) to operate.
Built for the CW and Voice Op
Like the CTR2-MIDI, the older single-encoder CTR2-Dial hardware supports an external paddle, key, and/or PTT switch input, so bring your paddles, remote operation is about to get fun again! The new CTR2-Uno/Duo hardware supports a dual-purpose external paddle, key/PTT jack and the CTR2-Quad hardware has individual jacks for paddles and key/PTT inputs.
CTR2-Dial firmware also supports a virtual PTT switch. Just touch the display to key your radio. You can even assign the virtual PTT switch to act as a straight key, although the latency through the system limits your code speed.
What CTR2-Dial Is Not
CTR2-Dial firmware, like CTR2-MIDI, is strictly a MIDI controller. It is not a complete radio controller like CTR2-Micro and it must be used with a control app that supports MIDI control. It only sends MIDI commands to the radio control app it is connected to. It does not receive status information back from the app or radio. Therefore, the value displayed for each parameter represent the last value sent to the app. If you change a parameter on the app that change will not be sent to CTR2-Dial.
Does it work with SmartSDR Windows?
Not directly. Like CTR2-MIDI, CTR2-Dial firmware is optimized for use with Marcus’ (DL8MRE) iOS/MacOS apps, but these are not the only apps it works with. It works this many other Windows, iOS/MacOS, and Linux radio control apps that support MIDI control, like Remote Ham Radio, Thetis, SparkSDR, and SDR-Console, to name a few.
To use the CTR2-Dial or CTR2-MIDI with apps that don’t support MIDI control, like SmartSDR for Windows, you must run a MIDI translator app like CoyoteMIDI. This middleman app translates the MIDI commands from the Dial or MIDI to mouse scroll actions or keystrokes to provide limited control for just about any app. For example, using CoyoteMIDI the Dial or MIDI can control the frequency on SmartSDR for Windows, WebSDR, and wfView. It can even be used as a jog wheel on Audacity.
If you’re looking for a small WiFi controller exclusively for Flex 6000 and 8000 radios that works with any version of SmartSDR (and even without it!), you can switch to CTR2-Flex firmware in the Settings menu of the CTR2-Dial firmware and connect directly to, and control the radio, without any 3rd-party apps.
But I Already Own a CTR2-MIDI
That’s wonderful and I appreciate your support!
If you’re running Marcus’ iOS/MacOS apps you can connect CTR2-Dial firmware and a CTR2-MIDI to the app at the same time. Just connect CTR2-MIDI using Bluetooth to the CTR2 Controller object in the app’s Tools menu. Connect the second one using USB to the CTR2 Dial Controller object in the Tools menu. To use USB MIDI, select the STAMP_S3 device if using CTR2-Dial firmware (or XIAO_ESP32S3 if using the CTR2-MIDI). Touch the Enabled button to connect.
You can also run two or more CTR2-MIDI and CTR2-Dial devices in Thetis using USB connections.
In Conclusion
I want to give a special thanks to everyone that has supported my projects over the years. The Dial is a direct result of that support. Your support and encouragement along the way has given me even more reason to continue pushing my own limits of user interface and product development. I could just create these projects for my own use but building them and sharing them with others that truly appreciate my work is the most rewarding part of this endeavor.
73, Lynn, KU7Q