CTR2-Mini is designed as a modular system where you choose the functions that are most important to you. This means your CTR2-Mini system can be easily reconfigured as your needs change.
CTR2-Mini: The Basic Building Block
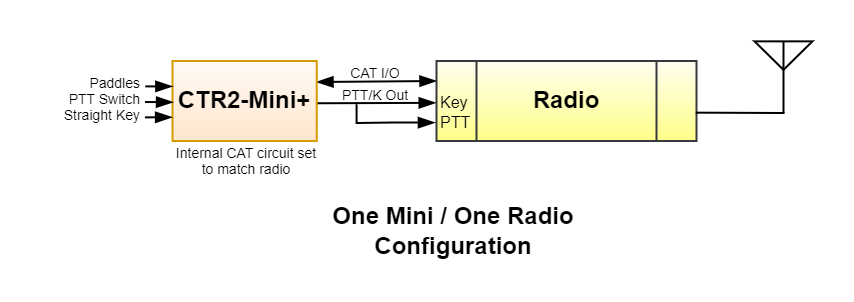
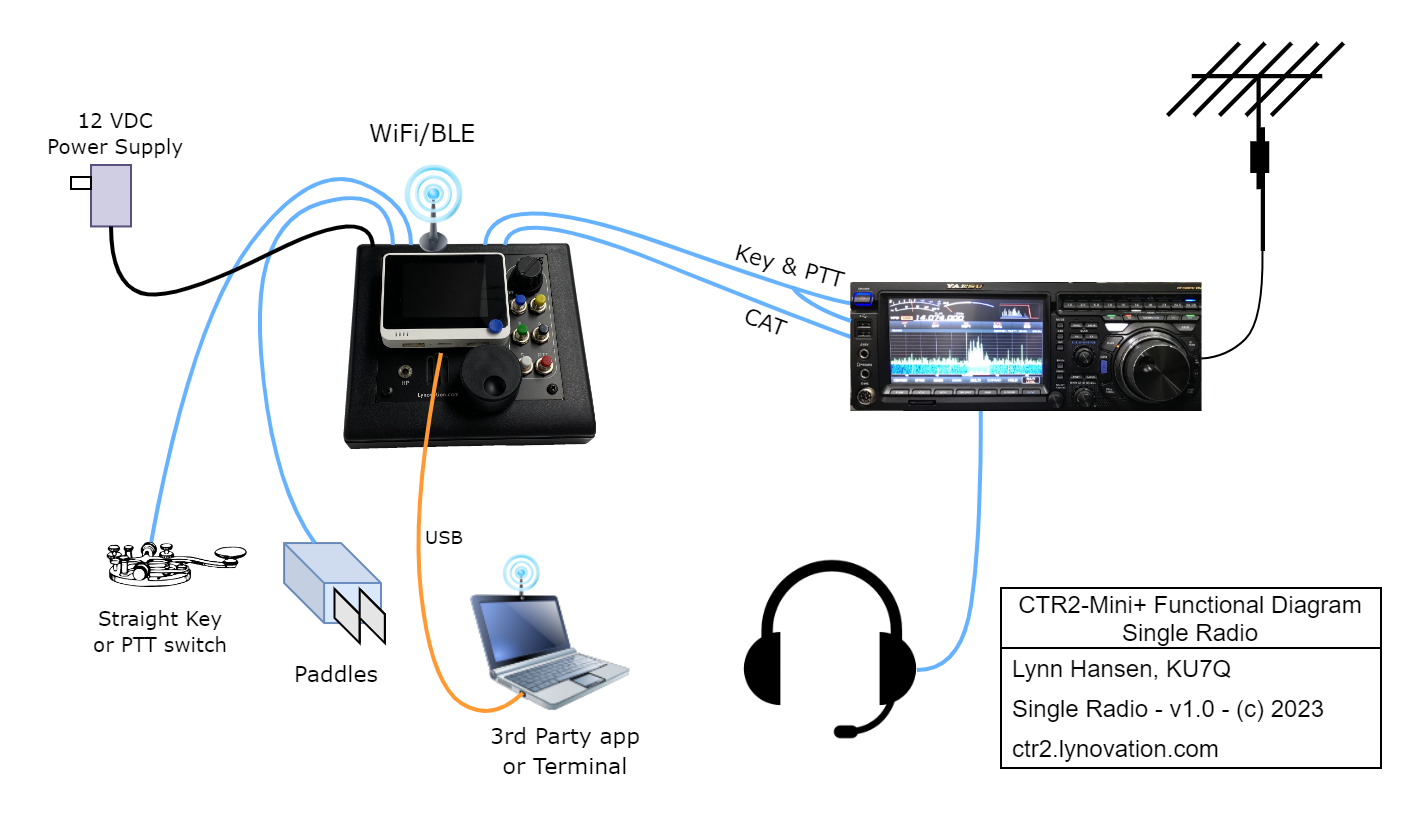
The CTR2-Mini+ (Mini for short) is the cornerstone of the Mini ecosystem. It can connect directly to, and control a single radio. It features a built-in memory/contest/keyboard keyer, enhanced tuning options, a dedicated meter display (S-meter, Power, SWR, ALC, and Compression, depending on your radio), simplifies tuning an external tuner, and manages your favorite frequency lists. A diagram of a simple control system is shown below. Simply connect the necessary Radio Interface Cables to the 3.5mm (1/8″) jacks on the Mini and plug them into your radio. The Mini includes a built-in CAT circuit that matches the Mini to your radio’s CAT port.
Controlling Multiple Radios
For the majority of hams, a single Mini is all they need. When the time comes that you want to control another radio in your shack you’ll quickly find it can be quite a nuisance to switch your mic, key, headset, and antenna between radios. This is where you’ll appreciate the Mini’s selection of options.
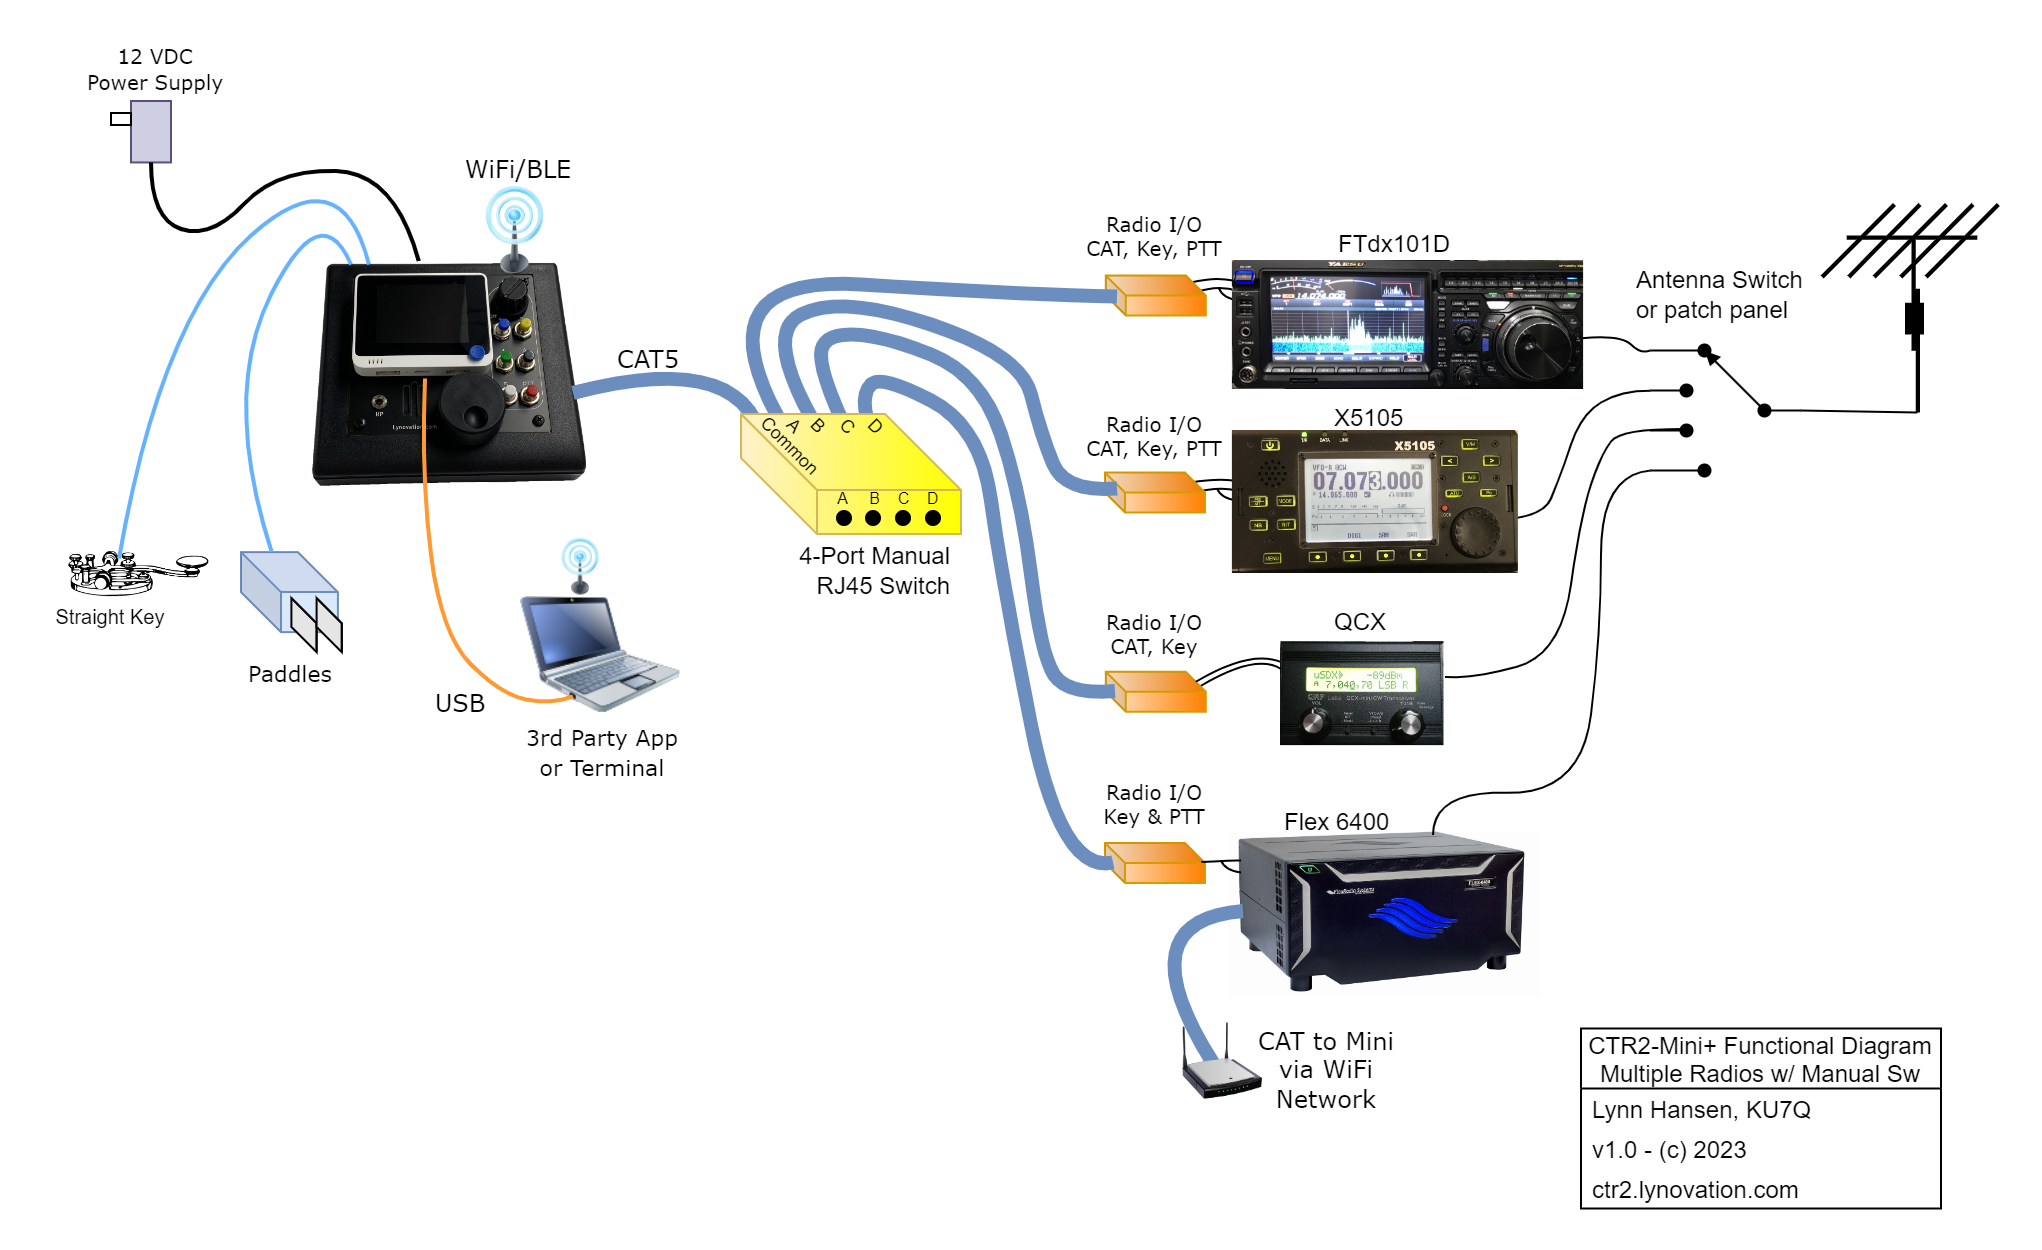
The Mini can be manage up to 16 different radio ports. The profile for each port stores everything the Mini needs to know about the radio on that port. Radio control signals are bought out to the RJ45 connector on the Mini to control CAT, PTT, and Key on the radio. These signals are then externally routed (switched) to the radio you wish to operate. In this configuration, control signal processing for each radio is done at that radio using one of two I/O module types.
Manual Signal Routing
A basic multi-radio control system is shown below. This system routes CAT, PTT, and Key signals using a manual RJ45 (CAT5) switch and four external I/O modules. To control one of the radios simply select it in the Radio Port menu then press the appropriate button on the 4-port manual RJ45 switch. The Mini’s keyer and PTT controls are shared with all the radios. You’ll need to manage your microphone and headset connections manually.
You can add additional switches to this scheme to route up to 16 radios to your Mini but manually switching this many radios can be cumbersome.
Discontinued Products
The rest of the information on this page if for products that have been discontinued due to overall lack of interest. I had hoped that there would be more interest but as with the original CTR2 the cost of these options outweigh many of their benefits. That said, they have provided me with a phenomenal learning experience and for the few that purchased them, I sincerely hope that you are finding value in them.
I have a small supply of parts and PCB for all of these options so if you’re interested in any of them contact me for special pricing.
The CTR2-Mini I/O Multiplexer can be used instead of the manual RJ45 switch. This device automatically routes the I/O signals from the selected radio to the Mini when you select that radio in the Mini’s Radio Port menu.
It also provides open-collector outputs that can be used to control an external antenna switch providing automatic antenna routing to the selected radio. A CTR2-Mini ASD (Antenna Switch relay Driver) is provided in case your antenna switch requires +12VDC to activate its antenna relays.

Up to three additional multiplexers can be daisy-chained allowing a total of 16 radios to be automatically selected in this configuration.
NOTE: The RJ45/CAT5 I/O signals from the Mini are not Ethernet. An Ethernet hub or switch WILL NOT work with the Mini.
One of the drawbacks of this configuration is that you will need to manage the microphone and headset connections to the selected radio. The next section shows what is needed to add audio management to the CTR2-Mini system.
Adding Audio
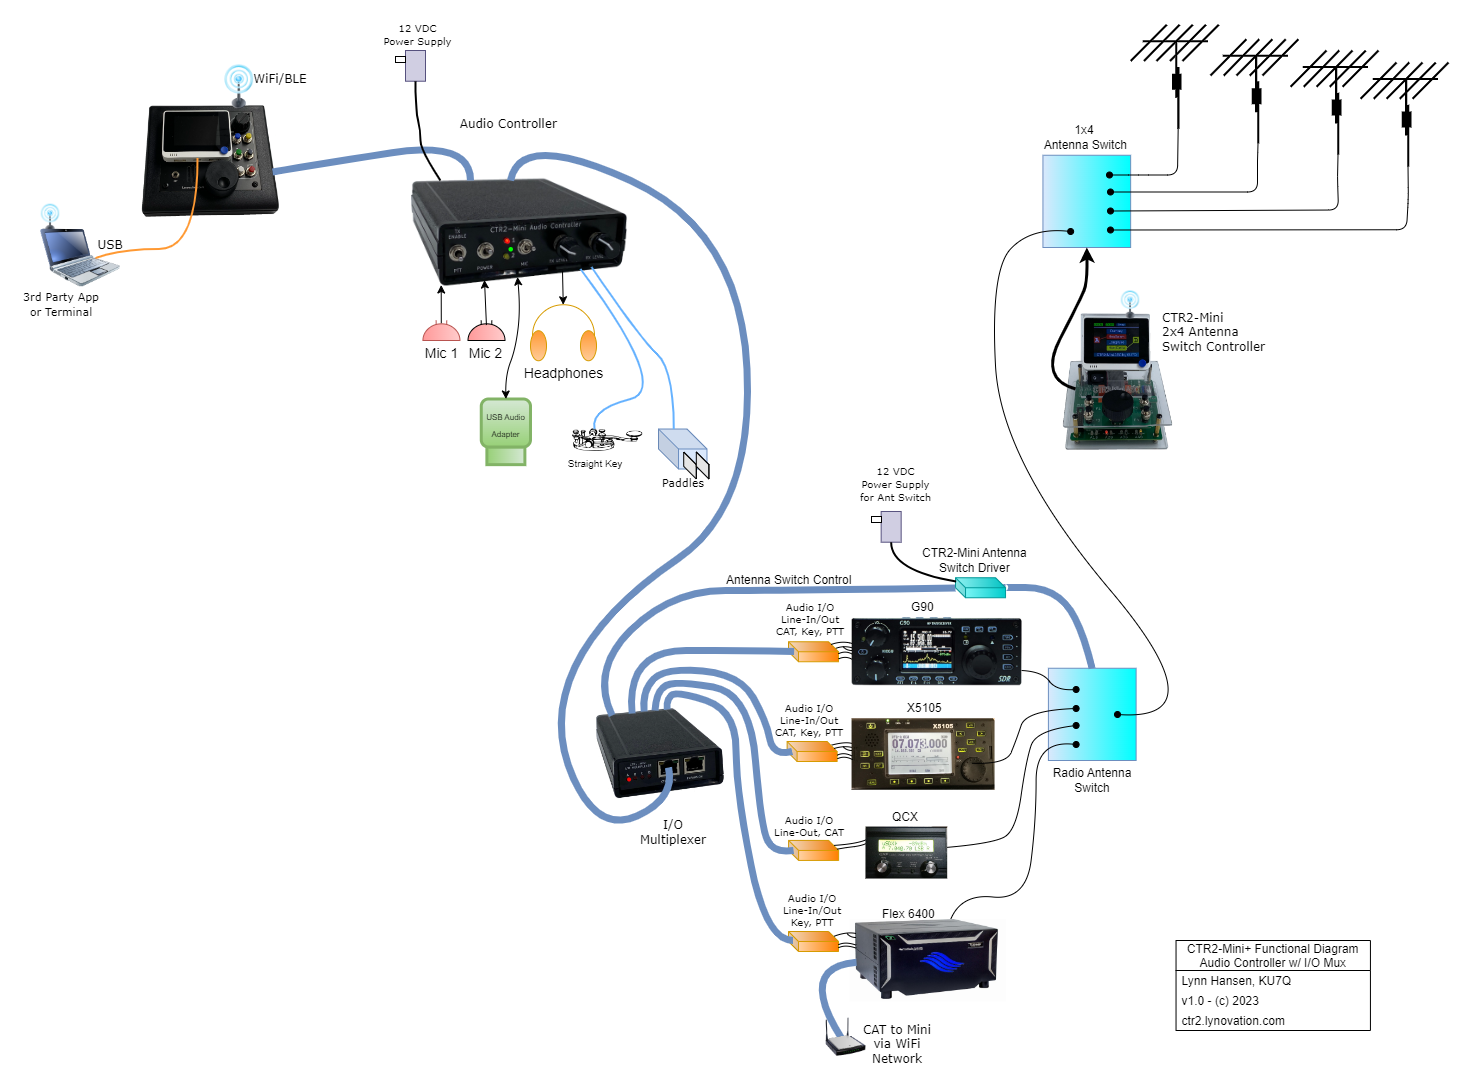
The next configuration is similar to the one shown above. The differences are that a CTR2-Mini Audio Controller has been added between the Mini and the Radio I/O modules have been replaced with CTR2-Mini Audio I/O modules. In this configuration 12 VDC is connected to the Audio Controller and it powers the Mini, I/O Multiplexer, and the Audio I/Os.
The Audio Controller adds transformer isolated Line-In and Line-Out signals to the radio I/O signals from the Mini. The I/O Multiplexer automatically routes these signals to the Audio I/O module attached to the selected radio. This allows you to share up to two microphones, a headset, and your PC’s sound card with all of the radios in your shack. As with the basic system described above, the multiplexer can control a remote antenna switch to route the antenna to the selected radio.
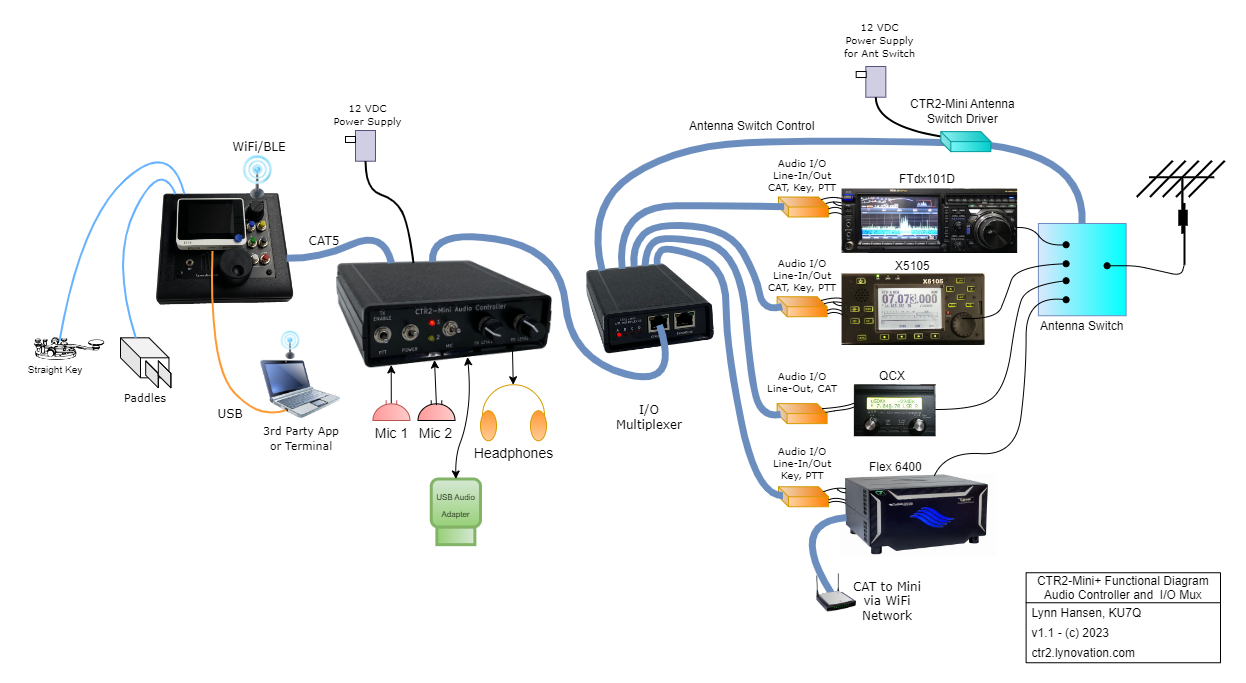
If you have multiple antennas you can add the CTR2-Mini Antenna Switch Controller (or any other antenna switch controller) and another antenna switch to route one or more antennas to a common antenna port. This port is then connected to the antenna switch under control of the I/O Multiplexer as shown in the drawing below.
Mixing Radio and Audio I/O Modules
The Radio I/O module and the Audio I/O module use different wiring since the Audio I/O interface also supports Line-In and Line-Out audio. Therefore, you can’t mix and match I/O modules on the same I/O Multiplexer. You can mix the two I/O module types by deploying two I/O multiplexers, one ahead of the Audio Controller for the Radio I/O modules and the other after it for the Audio I/O modules, as shown in the diagram below. The multiplexer before the audio controller passes just the radio control signals from the Mini. The Audio Controller is plugged into the first multiplexer’s Expansion jack. It adds Line-In and Line-Out to the downstream I/O wiring and passes it to the second multiplexer. This is a good example of the flexibility of the CTR2-Mini architecture.
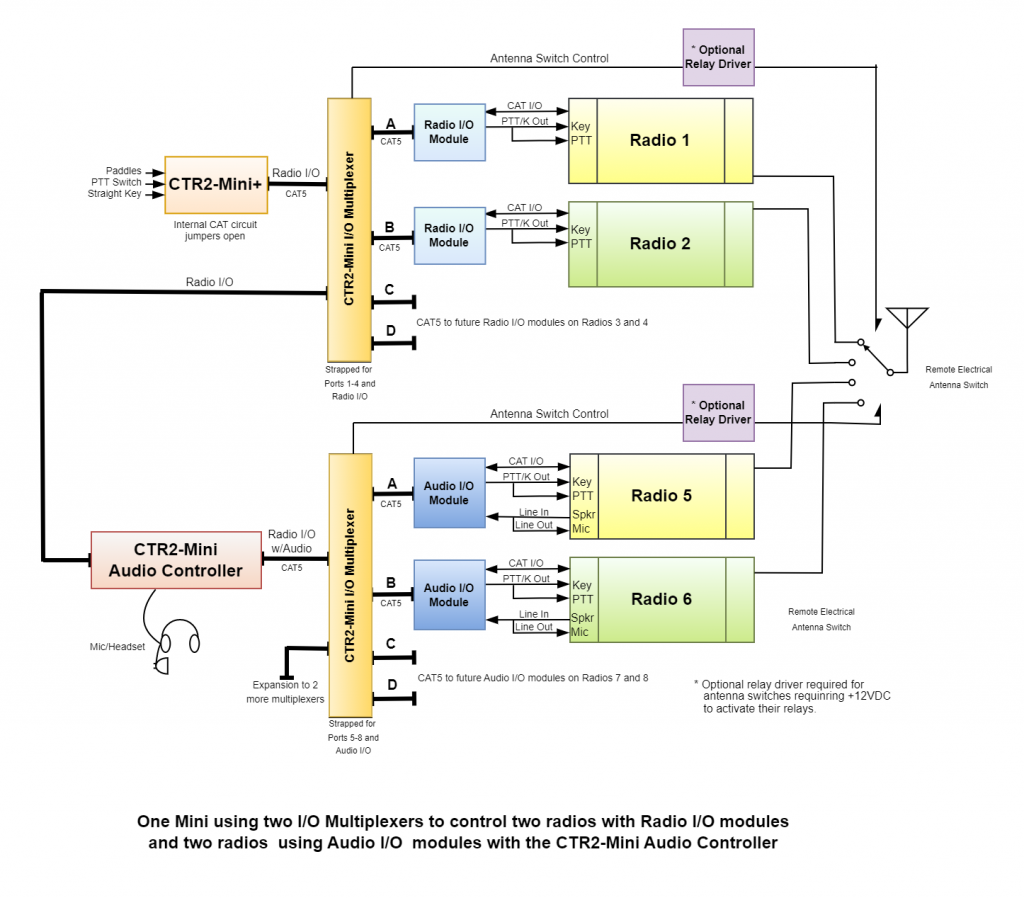
In this configuration the first multiplexer is strapped for Radio Ports 1 to 4 and the second multiplexer is strapped for Radio Ports 5 to 8. The antenna control pins on each multiplexer are wired to the 1×4 antenna switch such that that activate the antenna relay for the selected radio. You could strap the second multiplexer for Radio Ports 1 to 4 and just plug the two radios on this multiplexer into Ports C and D as both multiplexers will respond to the same port switch command from the Mini.
WiFi, Bluetooth, and Link Modes
The Mini supports both WiFi and Bluetooth connectivity to support several link modes. Link modes allow two Minis, connected to two radios to synchronize settings. In link mode one Mini is assigned as a server (Mini-A) and the other is assigned as a client (Mini-B).
Basic Link Mode
In Basic Link mode the transmit interlock (Tx Enable) and keyer settings are shared. This means that enabling the transmitter on one Mini automatically disables the transmitter on the other. Changing the keyer speed on one Mini changes it on the other. You can also push or pull the frequency and mode from one Mini/Radio to the other.
Basic + Frequency Link Mode
Basic+Freq link mode includes the Basic Link features plus the frequency and the mode of the two radios are synchronized. This allows you to use two separate radios on separate antennas as a full diversity receiver/transmitter. Just choose the receiver with the best signal when working a station that’s fading, or instantly start using the other transmitter if the main transmitter fails during a contest.
Basic + Tracking Link Mode
Similar to Basic+Freq link mode, Basic+Tracking link mode synchronizes the frequencies of the two Minis and their radios, but offset by their original (before sync mode was enabled) frequency spacing. For example, tune Mini-A to 14.1 MHz and Mini-B to 21.1 MHz then enable Basic+Tracking link mode. Now, tuning either Mini, or either radio will cause the other Mini and it’s radio to move the same distance. So if you tune Mini-A in this example to 14.15 MHz its radio will move to 14.15 MHz and Mini-B and its radio will move to 21.15 MHz. This is useful during a contest if you want to monitor the activity on two bands at the same time. To initiate a contact just enable the transmitter on the Mini you want to use and make the contact.
Remote Control Mode
In this mode Mini-B is in the shack, connected to your radio and Mini-A is the traveler. It connects to Mini-B over the network (local or Internet) and controls Mini-B remotely, just as if you were in the shack.