Without a doubt, the most frequent question I get when I put anything on social media about CTR2-Mini or CTR2-Mini+ is “What’s a CTR2-Mini?“.
The short answer is “What do you want it to be?“
This blog is dedicated to describing what the CTR2-Mini (“Mini” for short) is, but I’ve realized (thanks to several commenters) that I really need one page, a “marketing page” if you will, that just tells you what a Mini is and why you might want one.
In short, CTR2-Mini is a standalone radio controller with a built-in keyer. But is is so much more…
So, what does it do?
The Mini does a lot of things. You might want to consider a Mini if…
- you’re the kind of operator that loves technology and is always looking for new ways to apply it
- you are contemplating purchasing a dedicated remote VFO knob or external keyer for your radio
- you would like to easily change the tuning resolution so you can quickly navigate around the band
- you would like to define a tuning range so you automatically stay within a contest frequency or satellite linear transponder range.
- you would like to instantly return to the frequency (or maybe several frequencies before) that you just tuned away from
- you would like to ’round off’ the lower frequency digits so you can tune to the exact frequency
- you’re tired of digging through menus on your radio just to change an often used setting and would like to assign that setting to a function button for one-touch access
- you would like a dashboard for your radio that displays and controls your radio’s common settings in real-time
- you have an external tuner are are tired of doing the change mode->change power->key radio->tune tuner->unkey radio->change power->change mode dance every time you move your frequency
- you would like a remote meter display so can see the radio’s S-meter, power out, SWR, ALC, and compression levels all the time
- your radios are more than an arm reach away from your operating position or you would like to be able to control your radios from a small controller next to your keyboard
- you don’t want to have to boot your PC and run SmartSDR just to check band conditions or operate a sked with your Flex radio
- you would like a small panadapter display for you Flex radio in another room in your house (or anywhere else for that matter) to monitor band activity
- you would like dedicated tuning knobs for multiple slices Flex radio
- you’d like to just ‘set and forget’ the radio configuration in WSJT-X or your logging program when operating different radios
- you’d like to operate your radio from another location in your home or anywhere else
- you’re like me, and you think it’s cool to be able to build a device yourself that interfaces to some of the most advanced radios in the world and actually adds to your operating enjoyment
If any of these strike a cord with you, read on!
A little history…
CTR2-Mini evolved from several projects I’ve developed over the years. I chronicled several of these projects in QST and QEX articles. ARRL was kind enough to allow me to reprint them. If you’re interested the Mini’s ancestors you can read these articles on this blog post.
CTR2-Mini+
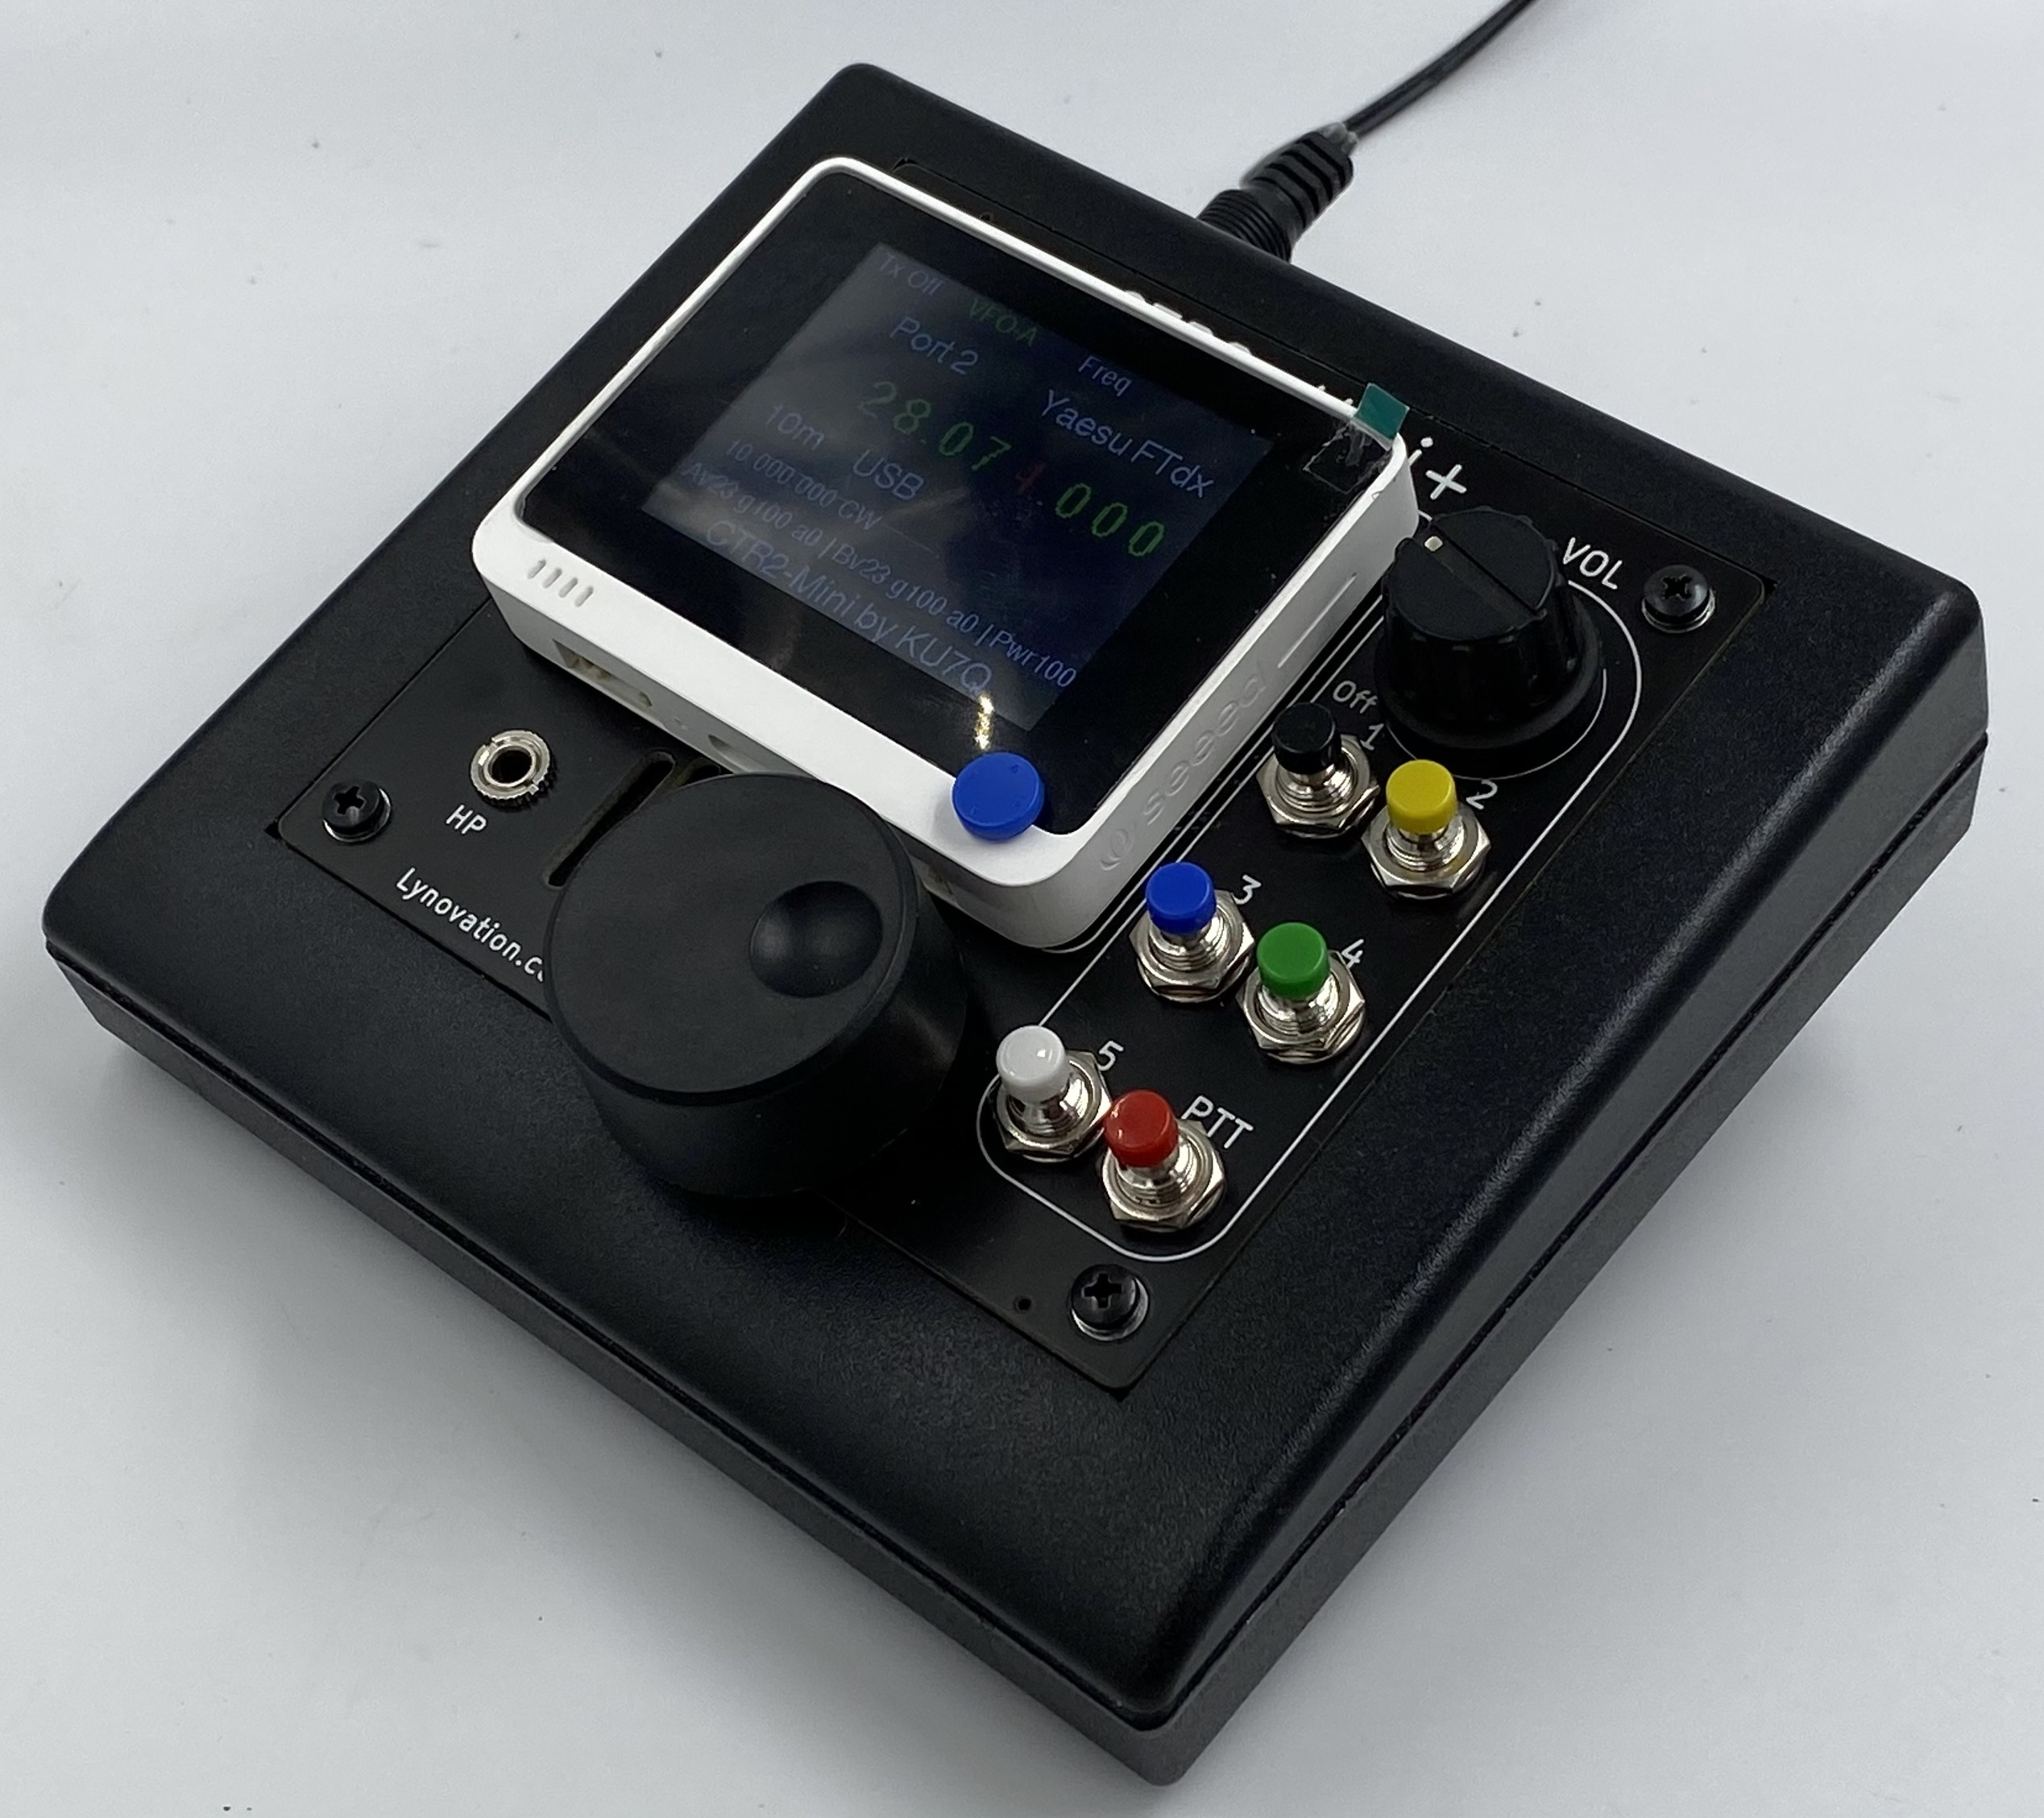
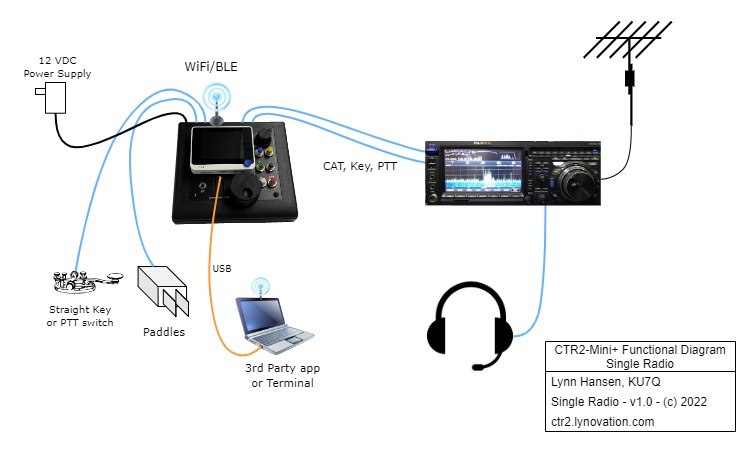
The CTR2-Mini+ is an expanded version of the original CTR2-Mini and is the cornerstone of the CTR2-Mini ecosystem. You can start with just the Mini+ as shown below for basic radio control/keyer for one radio. The system can be easily expand to add multiple radios and share you keys, PTT switch, multiple microphones, and a headset with them all.
Radio Control
At its heart the Mini is a compact, standalone radio controller that you can put anywhere on your operating desk. It’s especially handy if your radio is not located directly in front of you. In my shack the keyboard and monitors get that sweet spot and there’s no room for a radio on my desk. I put the Mini next to my key and keyboard and locate my radios on shelves, other tables, or the floor (sorry Flex, but you have no knobs!)
The Mini interfaces to the radio’s serial CAT (Computer Aided Transceiver) port. For most radios built from the 1980’s to around 2015 the CAT port was a proprietary serial port using one of three formats; normal TTL levels, RS-232 levels, or the Icom CI-V two-wire bus. The Mini supports all of these formats.
The three major manufactures, Icom, Kenwood, and Yaesu developed their own CAT control protocols. Not to be out done, in the early years Yaesu modified their protocol for almost every new model. They finally settled on a modified version of the Kenwood protocol for their FTdx line (thank you!). Other manufactures adopted either the Icom or Kenwood protocols for their radios. The Mini supports most versions of the ‘big three’ protocols. It also supports the Icom PCR1000 wideband receiver.
Every manufacturer used a different jack or socket for their CAT port. The easiest to interface to is Icom’s CI-V, a mono 1/8″ phone jack. Arguably the worst is the Yaesu FT-8×7 models with that awful 8-pin mini-DIN connector. I can supply adapter cables that adapt the Mini to most radio CAT, PTT, and Key interfaces. I also provide links to the raw commercial cables so you can buy them from the vendors directly. Some will required slight modifications, like replacing a mono plug with a stereo plug, or wiring a stereo jack to the accessory plug for your radio.
NOTE: Starting around 2015 manufactures started converting CAT ports from a serial port to a USB port. Most of the smart manufacturers continue to support the serial port in addition to USB, but some, I’m looking at you Icom and Xiegu, have chosen to go with only a USB CAT port on some of their radios (IC-705 and X6100). At the current time the Mini doesn’t support USB CAT ports due to the insane complexity of creating a USB Host port to interface to a radio’s USB serial port. However, this is on my road map and I hope to have a solution sometime in the future.
The Mini also has the ability to interface to any radio using an IP network connection. Some of the recent radios like the Elecraft K4 offer built-in network CAT control. Others support Hamlib rigctld. You can add an inexpensive serial terminal server interface or run serial terminal server software on your PC to put any radio on the network.
Even if you have only one radio, the Mini enhances your operation. One of the things you’ll really appreciate when tuning your radio with a Mini is the variable frequency step resolution. Press and hold the encoder then turn it left or right to increase or decrease the tuning step. Available steps include 1, 5, 10, 50, 100, 500, 1K, 5k, 10k, 50k, 100k, 500k, 1m, 5m, 10m, 50m, and 100m. Using these steps you can easily move around the band or the spectrum quickly. No more spinning the radio’s dial endlessly to move to the other end of the band.
In addition, the Zero Digits option can be used to automatically zeros the digits below the tuning digit allowing you to easily tune the exact frequency you want.
How many times have you tuned away from a frequency then wanted to go back to it? The Mini remembers the last 14 frequencies you stopped on (for longer than 10 seconds) and presents them on the Previous Freq/Mode menu so you can easily return to any frequency and mode, on any band with just a couple of clicks of the encoder. This list is stored on the SD so it’s always available even after a power cycle.
Of course the Mini offers band stacking registers so selecting a band automatically returns you to the last frequency and mode you were using on that band.
Contest Keyer and Code Practice
As expected, the Mini also includes a keyer. But not just any keyer. The Mini’s keyer features classic Iambic-A and Iambic-B modes in addition to Ultimatic and Bug modes. A special mode called Passthru simply takes the Dit and Dah inputs from the paddle connected to the Mini and passes them through to the Key and PTT outputs on the Mini. This allows you to connect the PTT/Key Out jack on the Mini directly to your radios’ Key input (or your favorite external keyer) using a 1/8″ stereo cable. If your radio’s CAT protocol supports it, the Mini automatically sets your radio’s keyer speed when you adjust the Mini’s keyer speed so you can use your radio’s keyer and control its speed with the Mini.
One option allows you to connect a straight key to the Mini’s PTT/K Input jack and use it at the same time you’re using your paddles. This input can also be used by logging programs such as N1MM to send contest messages, leaving your paddles free to send spontaneous messages. By default this input is used as a remote PTT switch input.
The keyer features 14 message buffers that can be assigned to function buttons on the unit. For contesters it allows you to assign your call sign, auto-incrementing contact serial #, and contest exchange to prosigns (^, #, and %). This allows you to create a contest exchange in one or more of the message buffers. A special prosign, *, allows you to temporarily increase you sending speed 50%. This is useful for sending the customary 599 signal report during a contest exchange. Entering *599* into the buffer sends just the report faster. Buffer #1 is assigned as a repeat buffer. The last message sent is saved in this buffer. Assigning this buffer to a function key allows you to repeat a contest exchange with a single button press without incrementing the serial #.
The Mini also provides a keyboard keyer. Just connect the USB-C port on the Wio Terminal on the Mini to your PC and connect a terminal program like Putty or Tera Term to the Wio’s virtual serial port. While in this mode just type in the terminal then press [Enter] to key out your text. You can also control everything on the Mini with the keyboard, i.e. you can control your radio from your keyboard. Press just the [Enter] key alone to enter Mini Menu mode.
As we’ll see in a minute, the architecture of the Mini system allows you to share your paddles and its keyer with every radio in your shack.
The code practice feature provides a code practice generator for those wishing to learn or upgrade their code proficiency. The practice trainer is based on the Koch method of learning code. The minimum speed of the trainer is 15 wpm. This prevents you from learning code by visualizing the individual Dits and Dahs. You learn the code by how each character sounds. There are plenty of web pages that describe how to use this method so I won’t go it it here.
Radio Dashboard
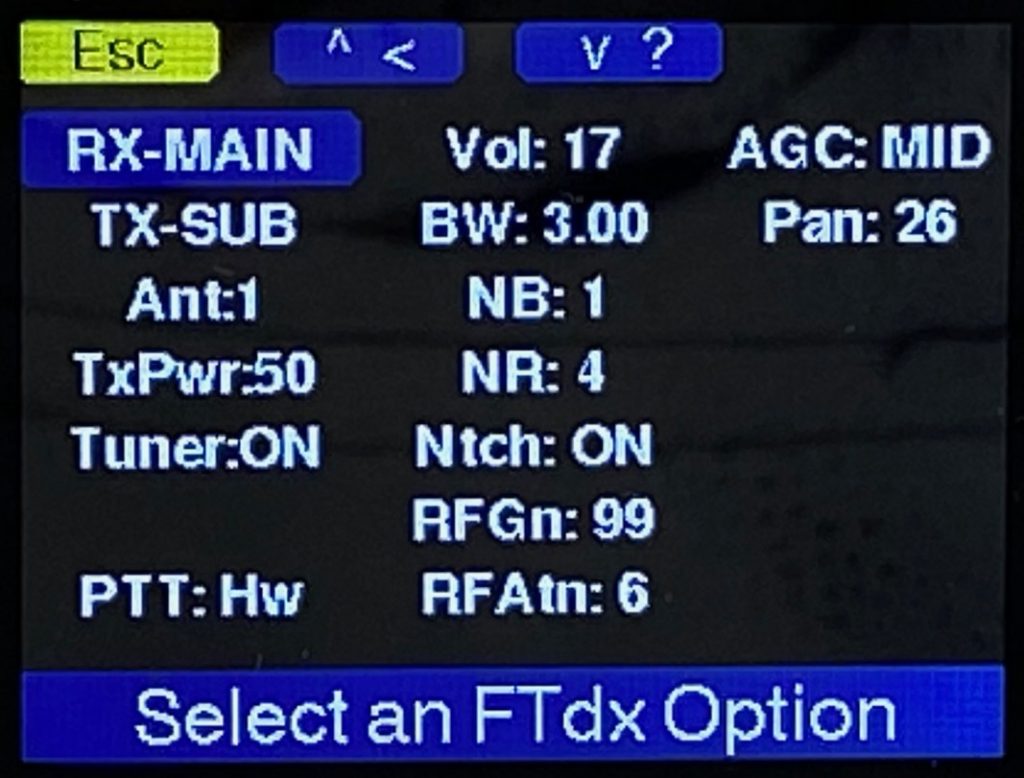
The Radio menu presents a dashboard of the common settings in your radio. You can open this menu and just leave it open if you find yourself always changing certain properties on your radio (volume, bandwidth, RF gain and attenuation, etc.) In addition, many radio controls can be assigned to the function buttons for instant access to the settings you use the most. Level controls are ‘sticky’ meaning once you open a level control (i.e. volume, Tx power, panadapter level, etc.) it’s window stays open until you close it.
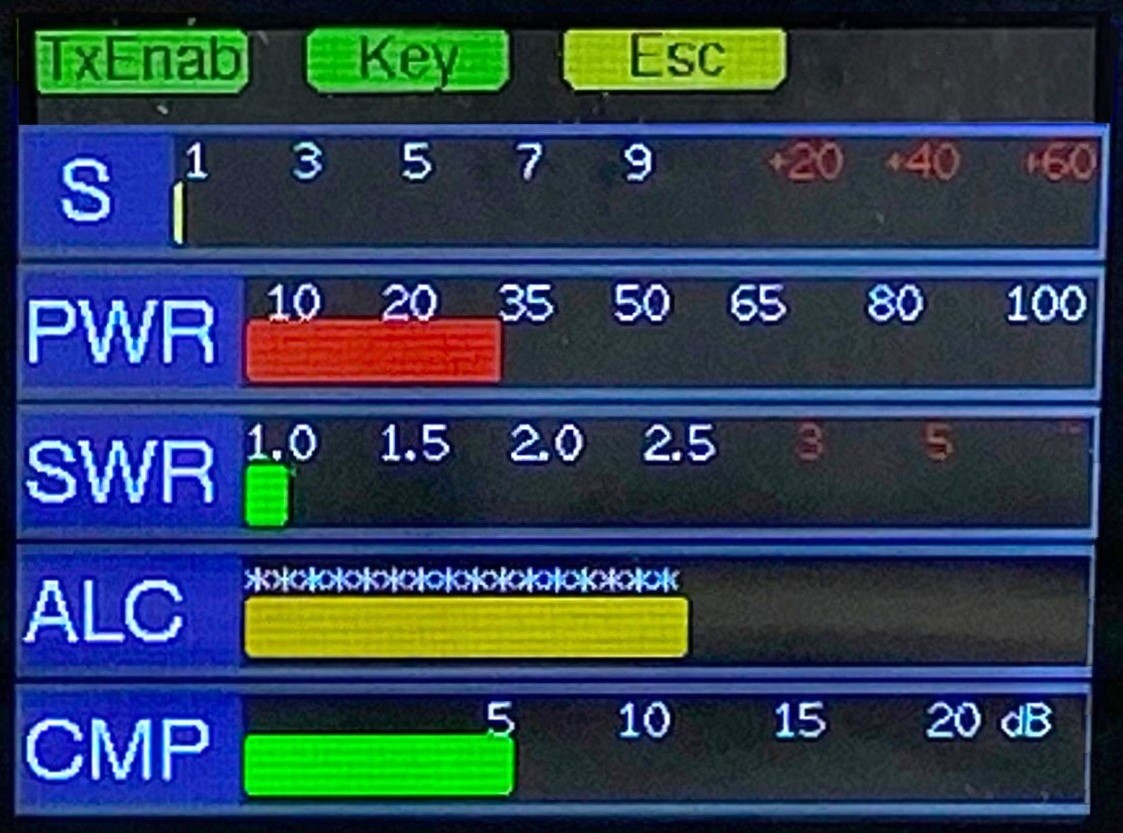
Remote Meter Panel
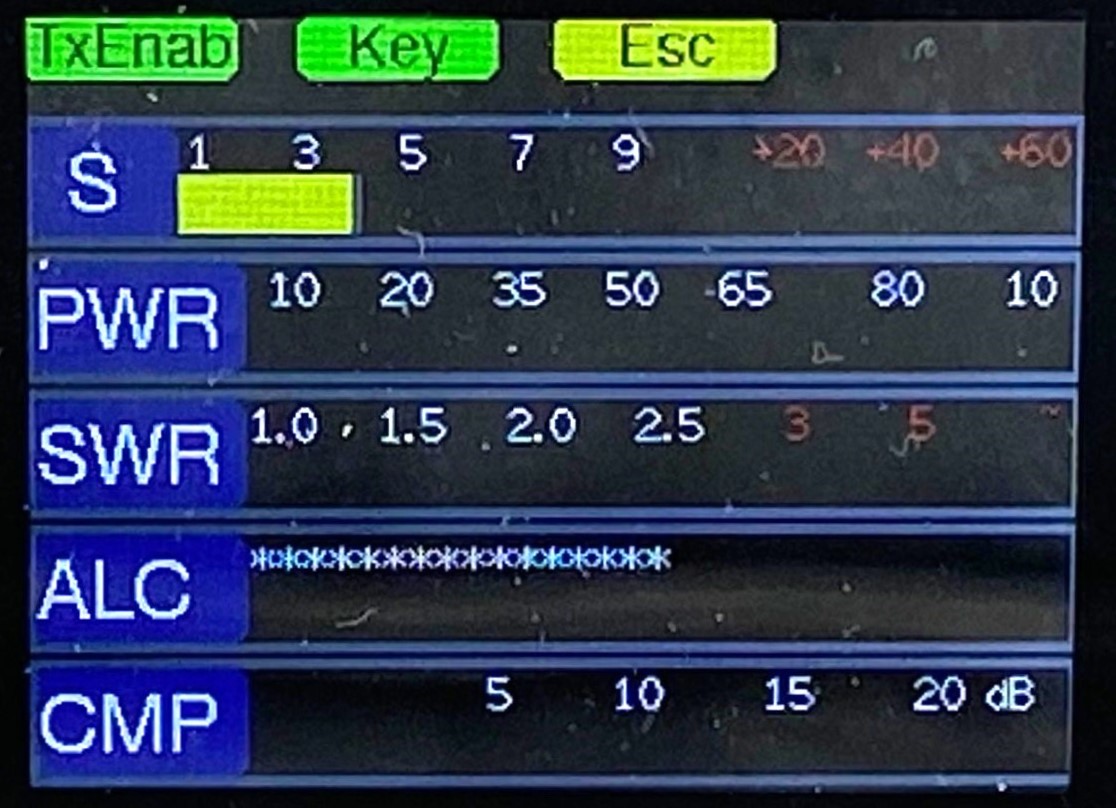
The Mini can also be used as a remote metering panel. Just select Meter Mode from the Mode menu and the display changes to display five meters, the S-meter, Tx Power Output, SWR, Compression, and ALC levels. This mode is ‘sticky’, i.e. it stays on once you enable it, even through power cycles. So you can just leave the Mini in this mode until you want to use it. Turning or pressing the encoder will temporarily return to the Home page where you can tune your radio, change modes, or do other housekeeping tasks. After 10 seconds of inactivity the Mini reverts back to Meter mode. Press the [C] button (Esc) to exit Meter mode and return to normal operations.
The two screenshots below show the Meter page in receive mode on the left and transmit mode on the right.
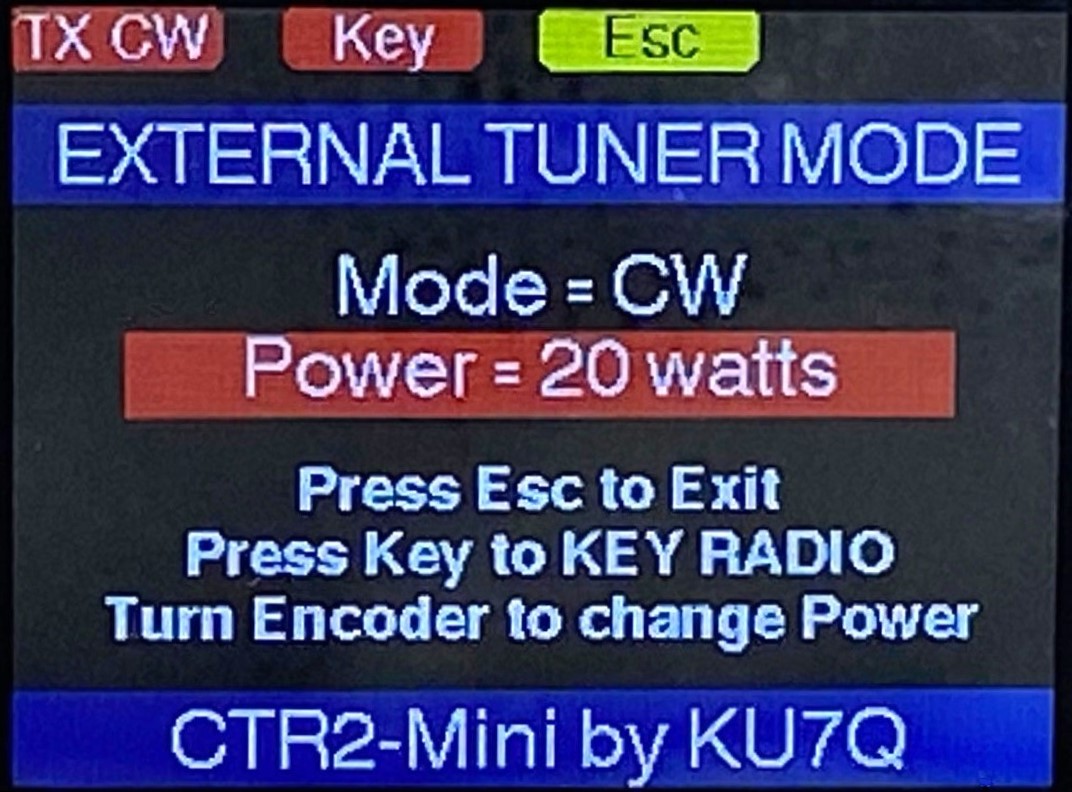
External Tuner Mode
If you’re like many hams you have an external tuner because your radio’s built-in tuner just doesn’t cover a broad enough range. And, if you’re like most hams, you probably cuss when you have to change your mode setting and reduce power every time you need to peak up your tuner, only to reverse the process to operate.
The Mini eliminates this frustration with it’s External Tuner Mode. When you enter this mode (from the Mode menu) the Mini automatically changes your radio’s mode to CW (or AM or FM if you prefer) and reduces the output power to a setting you choose. In addition, the [B] button becomes a latching Key Out control. Just press it once to key the radio and press it again to unkey. If this weren’t enough, the PTT switch on the function keypad or a remote PTT switch become momentary Key Out controls. Just press any of these buttons to generate a tuning carrier. You can instantly change your output power by turning the encoder. When you’re done tuning just press the Esc button (button C) to return to the original mode and power settings. It couldn’t be easier! Here’s a photo of External Tuner Mode in active key out mode.
Third-Party Apps
About now you’re probably wondering if the Mini is compatible with third-party apps like log books and WSJT-X. Yes it is. Just connect the Wio Terminal’s USB-C port (on the Mini) to your PC, connect your third-party app to the virtual serial port created for the Wio, then tell your program it’s talking to a Kenwood TS-2000. That’s it. The Mini will translate the Kenwood commands from the app to the protocol of whatever radio the Mini is connected to. You’ll still be able to control your radio using its tuning dial or the Mini. If you switch to another radio your app won’t even know it.
This isn’t a full TS-2000 emulation, just frequency and mode and a few other options like CAT PTT control, but that’s usually all the loggers and digital programs control anyway. If you’re running a full featured radio control app you’ll probably just want to stick with that.
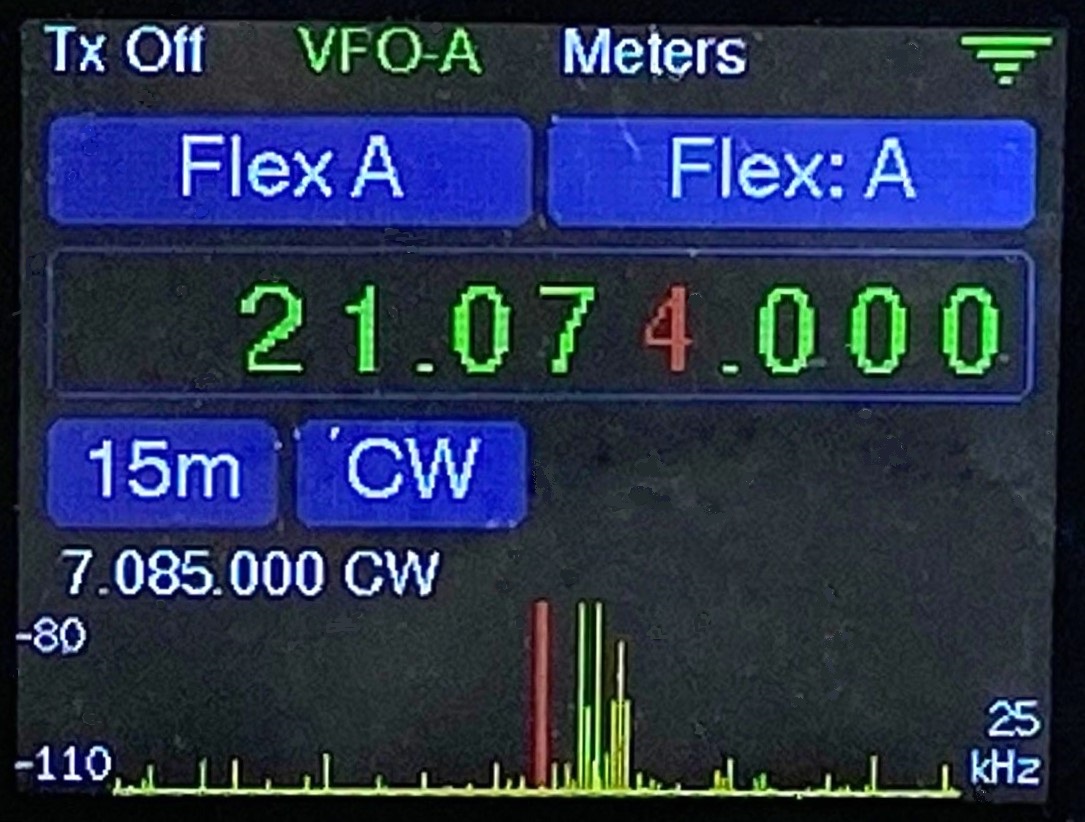
Flex Control
On of my primary drivers for creating the Mini was to provide a physical tuning knob for my Flex 6400. It does this quite well. The Mini uses WiFi and the Flex IP API to control the Flex over the network. It connects as either a GUI or non-GUI client. In addition, the Mini has enhanced Flex support that allows you to control many of the functions of the radio like Tx/Rx antennas, slice volume, bandwidth, filters, RF gain, Tx power, Tune power, and antenna tuner so you can operate your Flex in POR (Plain Old Radio) mode without SmartSDR running. The Mini even includes a mini-panadapter that’s available when the Mini is connected in GUI client mode. This panadapter, while not as robust and pretty as the SmartSDR panadapter, gives you a sense of what’s happening on the band. Imagine having a Mini placed somewhere else in you home just to monitor band activity on the mini-panadapter.
Radio settings can be assigned to the function keys allowing you instant access to the settings you change most. If that’s not enough, the Mini supports real CW and PTT over the network. Just take your Mini and a set of paddles with you and use SmartSDR on your iPad or connect your cell phone to an audio server like SonoBus or Mumble to handle the audio.
And yes, you can connect more than one Mini to your Flex at the same time, even on radios running v2.xx firmware. Assign each Mini to a different slice to get a physical knob and all the Flex features the Mini offers on each slice at the same time.
If you’re just looking for a physical knob for your Flex without the keyer/sidetone and serial radio CAT features of the full Mini you can add just an encoder and a function keypad to a Wio Terminal. Visit the FlexRadio Features page for the schematic.
Build it yourself
The Mini is designed such that anyone with moderate soldering skills can build the unit in a couple of hours. If you can solder .1″ pin headers and RJ45 jacks to a PCB you probably won’t have any problem building the Mini+. To see what’s involved with building a Mini+ download the Mini+ assembly manual.
I can supply PCBs and pre-cut enclosures for either CTR2-Mini or CTR2-Mini+. All PCBs have the SMT devices preinstalled by the factory. You just need to add the through-hole components and connectors. I don’t sell complete part kits. Instead, you can purchase the components you need to complete my PCB kits here.
I can also supply fully assembled, programmed, and tested units and radio interface cables if you don’t want to build your own.
Wrapping it up
I hope this answers the question, “What’s a CTR2-Mini?“. There’s a lot more information in the CTR2-Mini Overview post. If you’re interested in seeing the user interface in action I have several YouTube videos on my channel (highly rated for insomniacs :). You can also download the CTR2-Mini Operation Manual for an in depth look at the user interface. I plan on adding more videos in the near future to showcase the latest software changes and the new Mini+.
If you’ve followed the CTR2 projects you may be wondering where the CTR2-SO2R controller and CTR2-Antenna switch projects when. Well, I removed them from the site because of a total lack of interest in these projects. There are already a ton of products on the market that provide SO2R and antenna switching and my solutions didn’t seem to add anything of value. Live and learn!
Is that it?
That about covers the Mini, as it is today. This is a constantly evolving project. As new options or modes are suggested by users, or just percolate up from my subconscious, I add them. That’s part of the fun of being the developer… developing. I have a few things on my road map including getting a USB Host port to work for USB CAT only radios and maybe adding other protocols like TCI. I’m sure other things will pop up too. If you have an idea, throw it at me! The nice thing about the Wio Terminal is how easy it is to update the firmware. Just download the new firmware and copy it to the Wio. That’s it. No compiling, libraries, IDEs, or any of that stuff. Just copy and paste a file.
Thanks for checking out my projects. If you have any questions or comments please let me know. You can also contact me directly or via email. You can find my email address on QRZ.com.
73, Lynn, KU7Q